April 28, 2015

The Chinese Chippendale Stool

Hey y'all!

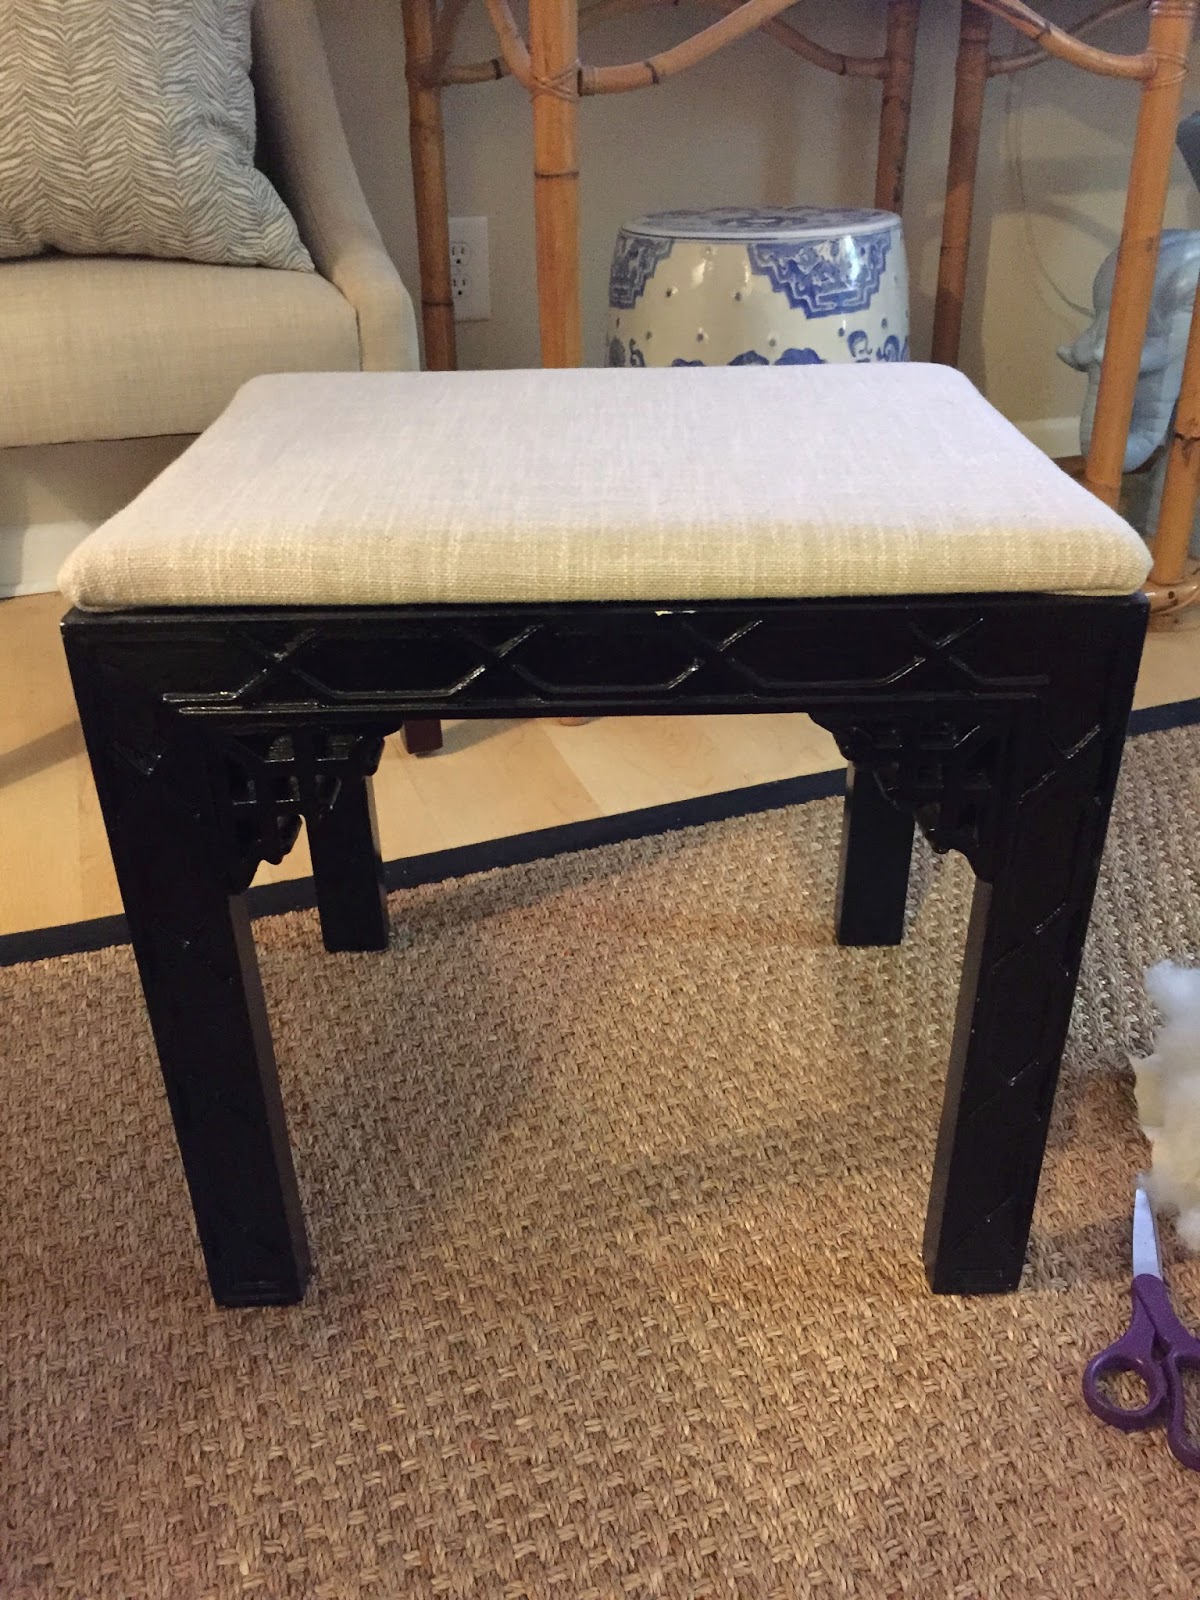
I hope your week is off to a good start! Today I want to share my most recent project with you. I found this Chinese Chippendale footstool at an antique shop near Pinehurst, North Carolina while visiting my aunt in the fall of 2013. I think it was around $35, and at first I wasn't going to purchase it... I was a broke college student! After calculating how many nights I would have to eat Ramen for dinner (kidding, kind of), I took the plunge. The details on this little stool were too cute to pass up!

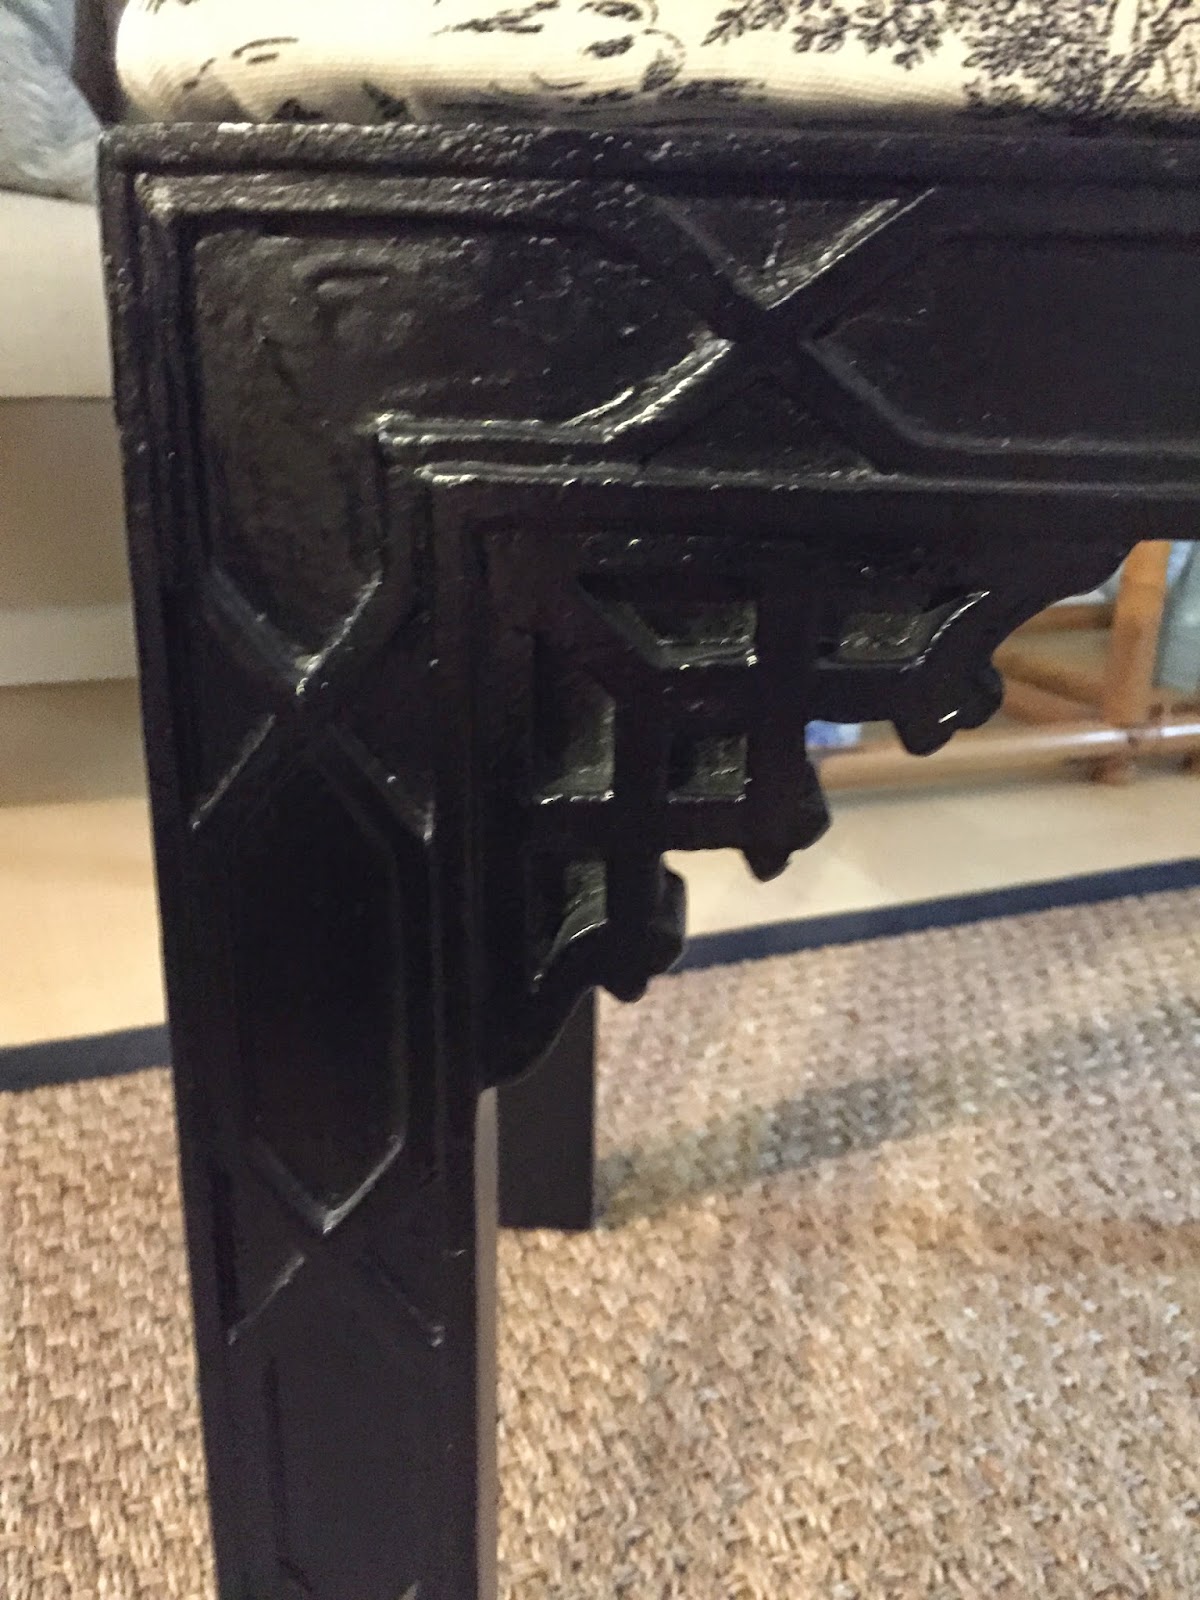
Check out that detail!

At the time I bought it, it was pained white and upholstered with a red and white wavy striped fabric. I hated the red and white, so I painted it glossy black and recovered it with a black and white toile fabric. Thinking the cushion was too flat, I overstuffed it with a ton of fiberfill. Later on, I regretted overstuffing it. It just looked a little out of place! However, it looked so much better (and fluffier) than before, so I ignored it for a while. It has been sitting in the corner of my apartment since I've moved in, and sadly hasn't gotten much use.

How it's been sitting...

After making the curtains that are currently hanging in my living room, I had a little extra beige fabric left over. It was the perfect amount to re-cover the stool! I've had this project on my to-do list for a few weeks, and this weekend I finally completed it.

Of course you want to know how I did it!

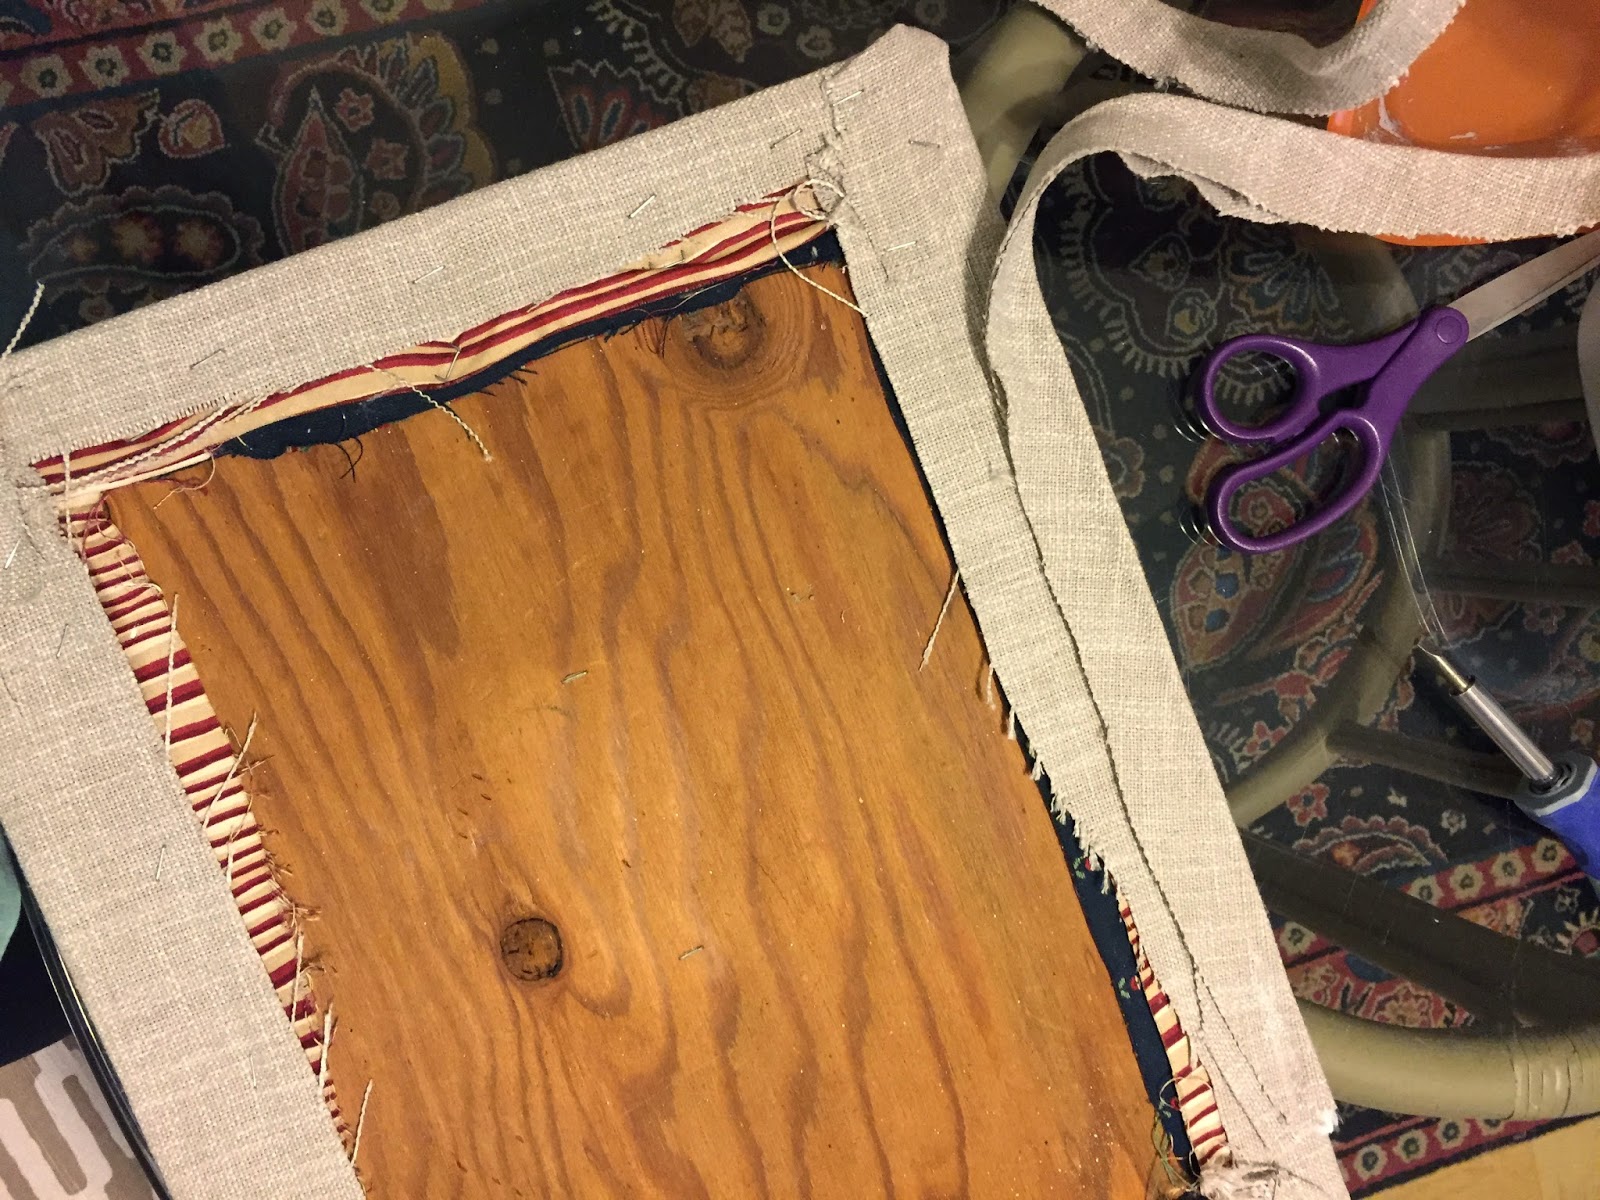
I took the cushion off of the stool base with a screwdriver, and ripped the toile fabric from the underside of the cushion. After removing all the fiberfill, I laid the cushion in the middle of my beige fabric and started reupholstering! Take it from me, reupholstering flat cushions is super easy. Using a staple gun you simply staple the straight edges down tightly, then fold the corners over tightly and staple those as well! For some reason, I find this really fun.

The fiberfill is embarrassing!

At this point, I placed the cushion back on the stool and observed my work. Honestly, I could have stopped here. It looked great to me, however I thought it was missing something. Being unsure of what to add, I screwed the cushion on, snapped some pictures, and did a little research.

Not bad, huh?

Enter my newest DIY excursion- piping!

I checked out some piping tutorials online, but was discouraged when almost all articles showed step-by-step DIY piping with a sewing machine. Don't get me wrong, I love sewing projects (I learned how to use a sewing machine in middle school!) but I'm an amateur at best. I hate using patterns and I'm very impatient, so I've never purchased a zipper foot for my machine. I usually try to avoid using zippers or any project that I can't sew up by hand (like all of my pillows).

SO, I was sold when I read a blog explaining how to make your own piping without a zipper foot. How, might you ask? A hot glue gun! This was a sign- super easy, cheap, and fast... my kind of project!

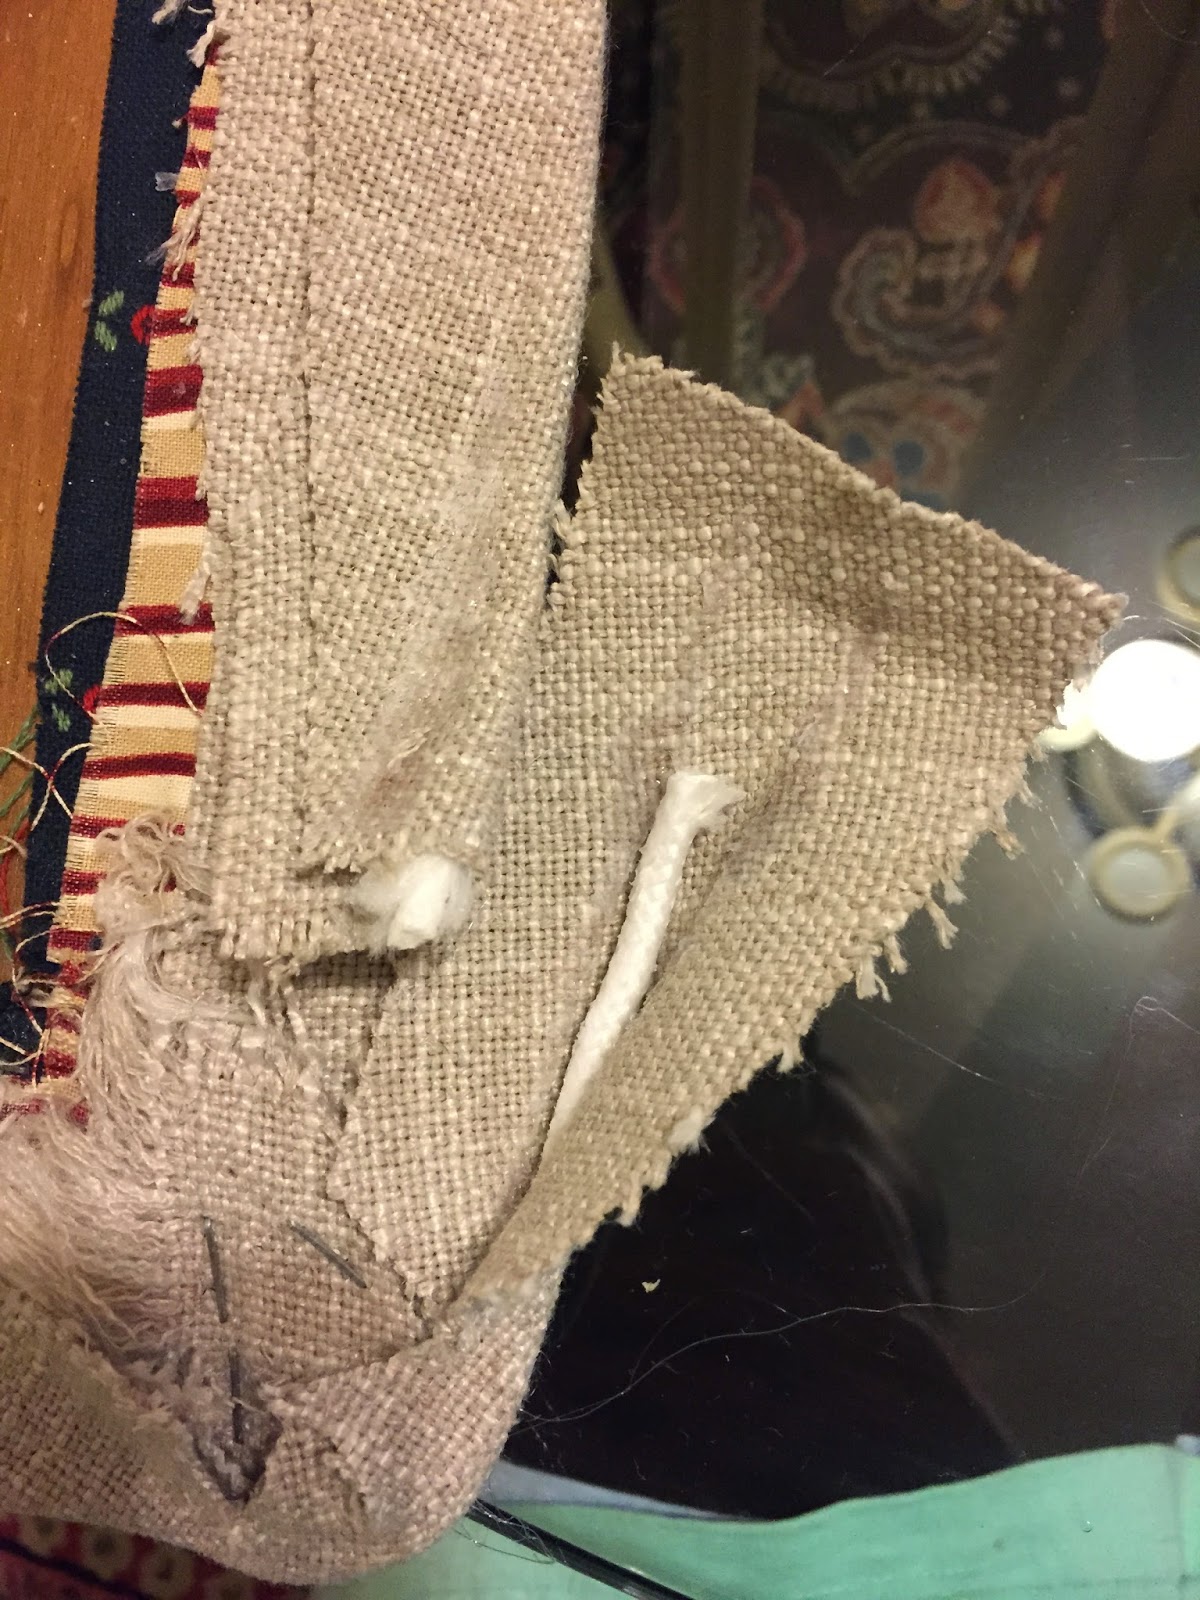
Most websites explaining how to make piping mentioned using cotton cord, which can be found at craft stores. Since I'm pretty lazy, I looked for cord at Walmart when picking up a few miscellaneous items. Of course I couldn't find any, but I did find a $2 clothesline in the laundry section, which was the perfect circumference for my stool's piping. I brought it home and got to work.

I first cut two long strips of my fabric as "on-the-bias" as I could (I repeat, I'm lazy and I like quick results). I hot glued the strips together face to face on one end, making one long strip of fabric. Then, I simply wrapped the fabric around my "cording" and started hot gluing it down tightly. The most annoying part of this was the hot glue strings. Seriously, it was that fast and easy.

My materials...

How the "piping" looks while wrapping it...

After I wrapped all my cording, I came up with one long strip of "piping." I next took the cushion off the base, flipped it over, and started hot gluing my piping around the perimeter. I hot glued the excess fabric, so that the "pipe" part hung off the side of the cushion. When I got to a corner, I cut little triangles in the excess fabric so it would bend easier, and hot glued the piping in a curve.

How it looked when I first started attaching the piping...

My triangles in the curve...

Once I reached the starting end of the cording, I pulled the hot glued fabric apart enough to fold the fabric over and cover my raw cording end (does that make sense)? This part probably took the longest. And by that, I mean "three minutes."

I folded that little top part over!

Ta-da! See all the other old fabric? Ugh!

I quickly screwed the cushion back on, and Voila! My stool is complete! 


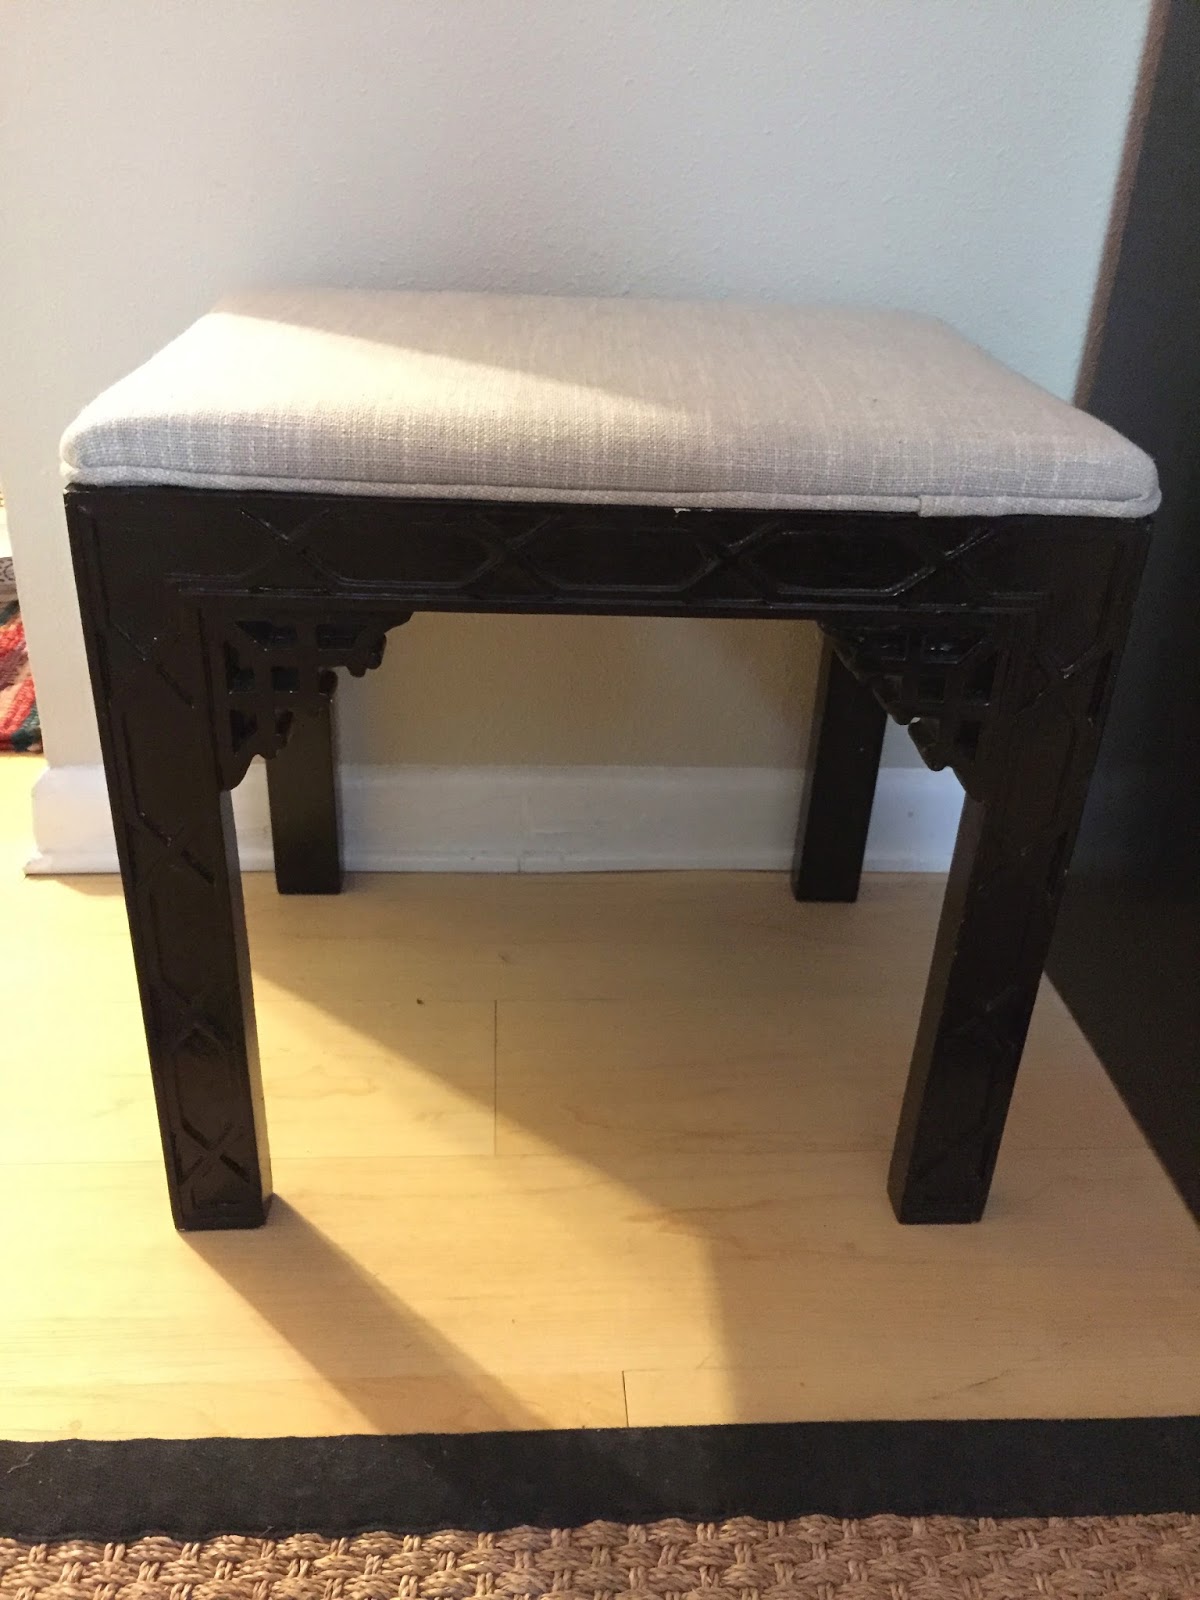
Up close! Looks legit, right?

I love this fabric because its neutral and matches both my curtains and chairs! I now have it sitting in front of a matching chair, even though the chair has wooden legs and the stool is glossy black! It all blends, right? I think so. Plus, the stool makes the chair much more inviting to sit in. It looks welcoming, instead of stuffy. I sat with my feet up for most of Sunday, checking out my new perspective on my apartment. :)


What do you think of my stool re-do? Are you tired of reading my rambling yet?

Until next time!
-Emmi


April 25, 2015

A New Coffee Table

Hello again!

How are you doing on this rainy Saturday? Today, I'm sharing with you my new coffee table. Since moving in, I've gone through a few coffee tables very quickly (thanks to Ellie and her anxiety chewing). Because they get destroyed so quickly, I haven't invested in a good-looking table yet. Honestly, after finding this new coffee table, I might never (unless of course, the beast gets to it)!

Months ago, I found a black coffee table at Goodwill. It was large, wooden, and looked great in my apartment (because it's black, of course). Being less than 20 dollars, I snatched it up. Months later Ellie had gotten to the corners of it (naturally), and I attempted to cover up the scratches with a fresh coat of black paint. Unfortunately the paint never dried right, causing everything to stick to the surface. Trust me when I say it was incredibly annoying! So, I started keeping my eyes peeled for a new table. 

About three weeks ago, I saw this dull table at Goodwill.


Unique? A little, maybe. I saw minimal potential in the table, but loved the fretwork and brass details. For 30 dollars, however, I deemed it unworthy. So I kept on browsing, eventually leaving empty-handed. A week later I came back, and the same table was still sitting there. Weird? Absolutely! Especially since it had been marked down to 10 dollars! With it's glass top, I knew I would be able to slide things around on it, which was the main reason I bought it. I ran to Lowe's, grabbed four cans of black spray paint, and got to work!

A few coats later, I came up with this!


And with the help of a little Brasso, the brass details look much better!


And with all my decorations on it...


What do you think? I had no idea the table would look this good in my apartment. It turned out a thousand times better than I thought it would! Surprisingly, it goes really well with the rest of my decor! 

Until next time!
-Emmi 

April 19, 2015

Ellie's 1st Birthday Party!

Hey y'all!

I admit whole-heartedly that I am a crazy dog lady. In true crazy dog lady fashion, I threw a party for Ellie for her 1st Birthday this Saturday! I invited a bunch of friends from work who brought their dogs, making it a true "paw-ty!" I have tons of pictures to share (thanks to Meg!) so you'll have to bear with me for this post!

We had the party at Dalton and Will's house, who have a fenced-in backyard. This was the perfect place to let all the dogs run wild!

All the pups hanging out in the fence! Winston, Ellie, Duke and Otis.

Dalton and Will cooked tons of food (thanks guys!) so all the humans could have a party of their own. :) Being a true psychopath, I make homemade "pupcakes" so the doggies could try something special.  (For any other crazy dog ladies, I'll include the recipe at the end of this post!)

The pupcakes before they went in the oven!

And after being iced and decorated!

Naturally, there had to be a theme for the party. I chose black, white and red, inspired by Ellie's fur and the color that looks best with it! :)


It's getting a little crazy, right?

In addition to the pupcakes, I got tiny little Blue Bell ice cream cups for the dogs! 

I know, I know. Just bear with me. 

Before our friends came, Ellie and I had a little photo shoot.


I love this sweet baby!

Once everyone arrived, we sang "Happy Birthday" to my little birthday girl, and all the dogs had a pupcake!


The peanut butter was a hit!

Afterwards, all the pups ran around in the fence, and the humans got to have their own party!

Ellie, Otis and Winston.

The stare-off!

All in all, it was a great day! The dogs had a blast, the rain held out, and there was tons of food. Ellie slept like a rock last night, and today is feeling very lazy!

Until next time!
-Emmi and Ellie


Peanut Butter Pupcakes

-1 large egg
-1/4 cup peanut butter
-1/4 cup vegetable oil
-1/3 cup honey
-1 cup shredded carrots
-1 cup whole wheat flour 
-1 teaspoon baking soda
-1/3 cup quick cooking oats

1. Pre-heat oven to 350 degrees. Line cupcake tin with 6-8 cupcake liners (my batch made 8 pupcakes).
2. Combine egg, peanut butter, oil, honey, and shredded carrots in a large bowl. 
3. In a separate bowl, combine flour, baking soda, and oats. Add to carrot mixture and stir until all ingredients are fully incorporated. 
4. Fill cupcake liners with batter.
5. Bake for 15-20 minutes, until a toothpick inserted in the center comes out clean. Take out of oven and cool on a wire rack.
6. Top with creamy peanut butter and a Milkbone, if you wish!

April 15, 2015

My Apartment: Then and Now

Hey y'all! 

Through the pictures I've posted on the blog, you've probably seen bits and pieces of my apartment. It is not glamorous by any means, but it has come so far from what it looked like last May! After looking through my camera photos, I've found some pictures from the past (almost) year, and a few random ones from recently. I thought you might want to see how my apartment has progressed. Embarrassingly enough, most pictures showing my apartment have Ellie front and center, so you'll have to suffer through her precious face. My apologies! ;)


Excuse me leg! Here's what my TV table looked like until December. This TV was a graduation gift from high school! It looks a little silly with all those knick-knacks around it, doesn't it? The table turned into this... 


Before finally transitioning into this...


1000 times better, right? A few Christmas presents helped me out here. ;) The palm tree lamps are actually candle sticks from my aunt's store, which I turned into lamps with the help from a friend!


Here's my imitation Dorothy Draper chest (and Ellie), honestly looking very similar to how it looks now...


With the addition of some gold ring pulls, a bigger seagrass rug, and a few occasional chairs!


And lastly, my blue rattan chairs now have a new hue!


BLACK! I moved my bar cart onto a green side table (which you can see in the corner of this photo), and my table into the center of the breakfast nook. I think the chairs look more adult in black. This isn't the greatest picture of them, but you'll have to take my word for it! 

 Lots of hunting, shopping and picking has led up to my apartment today! What do you think of my updates? Doesn't the place look a ton better? Hopefully it only gets better from here!

Until next time!
-Emmi


April 13, 2015

How I Do It: A Spring Wreath

My apologies for months of silence (work + personal life have been the craziest), but I'm finally back on blog bandwagon (hopefully), with a few new posts to share!

I've recently put together a new wreath for springtime! If you remember, this is what I've had on my door since February. 


So winter-y, right? And this is what the door is sporting now...

Spring-y! 

I know you want to know how I did it! I randomly stumbled into Hobby Lobby back in February (I've now forgotten what for), and I saw that artificial flowers were half off! If that isn't a sign to start a new wreath, I don't know what is. So, I collected some sprigs of greenery, a new grapevine wreath (which were super cheap), and some wired ribbon and got to work!

I started with the necessities: a hot glue gun and glue sticks, and floral wire.


I chose these sprigs because they looked "spring-y" to me. After gathering my supplies, I removed all the small white flowers from their bases, the green berry sprigs, and some of the covered wire, curling them into tighter loops.


I attached the white flowers around the wreath with hot glue as evenly as I could... 


Then the berry springs and wire twists...


Creating this! 

I left a gap in the bottom, where I knew I wanted to attach my bow. Next, I got my "hops-like" sprigs and removed the little flower balls so that I could place them exactly where I wanted them. 


At this point, I hung the wreath on the wall to see exactly where I needed the flower balls. After lots of standing back, looking, hot glue burns, and tons of flower balls later, I came up with this...


Using the floral wire, I attached my bow...


And voila! 


I plan on adding some larger flowers closer in to the summer (maybe magnolias?) to make this wreath look a little fuller! What do y'all think? Do you make a wreath for your door every season? 

Until next time!
-Emmi and Ellie